Integrate Login with Amazon with Your Site
Buy with Prime API is now available for early access
Sign up for early access to the Buy with Prime API using the 'Sign Up' button below. The API may change as Amazon receives feedback and iterates on it.
Login with Amazon (LWA) allows users to log in to third-party websites and apps by using their Amazon account credentials and grant those third-party websites and apps access to their Amazon customer profile data. LWA is based on the OAuth 2.0 authentication framework.
When you Use the Buy with Prime UI Library and follow the Steps to Use the UI Library to add Buy with Prime to your checkout flow, the user clicks a link that initiates the sign-in flow through LWA. During that process, you request access to the shopper's profile data. LWA then redirects the user to your site.
After LWA redirects the user to your site, you use the shopper's profile data when you call the Buy with Prime API. You call the Buy with Prime API when you populate delivery cards and Prime benefit cards. You also might use the shopper's profile data to provide a smoother checkout experience by prefilling the shipping address with the shopper's default shipping address and mobile number.
To have these capabilities, your website must integrate with LWA. LWA integration is also required to interact with some Buy with Prime interfaces, such as when you create a delivery preview or create an order. For details about LWA, see the Login with Amazon documentation.
Steps
To set up Login with Amazon to use with Buy with Prime, you take the following steps:
- Create an LWA security profile.
- Add your website to the LWA security profile.
- Get your LWA security profile information.
- Get your Buy with Prime target ID.
- Register your LWA security profile with the Buy with Prime team.
- Handle redirects.
- Handle the authorization code flow.
Step 1: Create an LWA security profile
Follow the steps in Create a New Security Profile.
Step 2: Add your website to the LWA security profile
You must now set up your Allowed Origins and Allowed Return URLs in your LWA security profile. These security measures are put in place by LWA to ensure that the shopper's Amazon customer profile data is only shared with authorized third-party merchants and that the shopper is redirected back to the correct location after the sign-in process.
Follow the steps in Add your Website to your Security Profile. In these steps, you set the following URLs:
-
Allowed Origins: You can set this to your website's domain. For example, if your website’s domain is
https://www.example.com, addhttps://www.example.comto Allowed Origins. -
Allowed Return URLs: Add any URLs that you want to redirect the user to after they sign in. For details, see Handle redirects. Any
redirectUrlthat you specify on a delivery card must be in your Allowed Return URLs list.
Step 3: Get your LWA security profile information
From your security profile settings in the LWA console, get the following information:
-
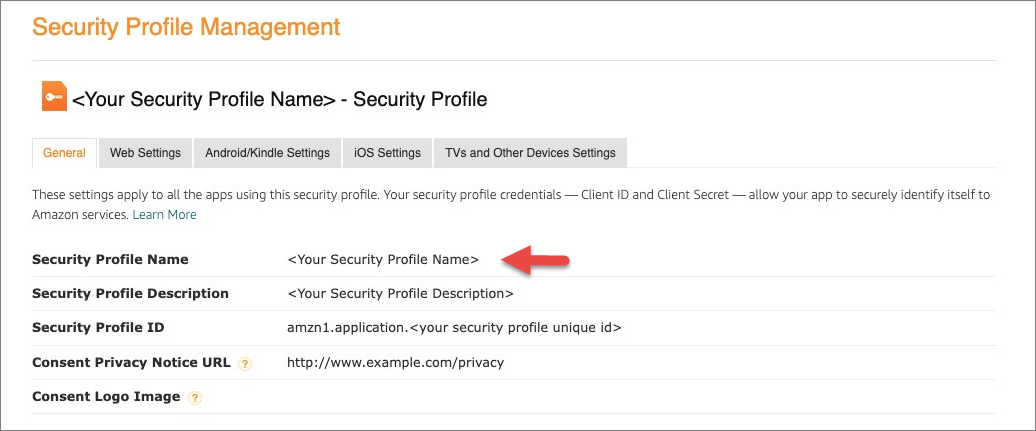
Security Profile ID: Get your security profile ID from the General tab of the security profile, as shown in the following figure.

-
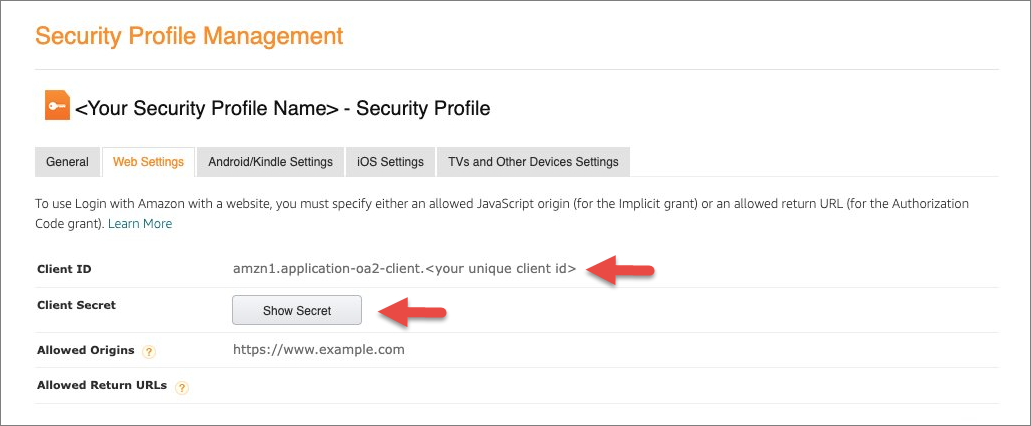
LWA Client ID and LWA Client secret: Get this information from the Web settings tab of the security profile, as shown in the following figure.

Step 4: Get your Buy with Prime target ID
To find your Buy with Prime target ID in the Buy with Prime console, perform the following steps.
To find your Buy with Prime target ID
-
Click the Channel ID button.
You are taken to a URL that looks likehttps://console.buywithprime.amazon.com/?accountid=b-><your business account id>&productid=bp-<your target id. -
When the page loads, get the
productidfrom the query parameter of the URL described in the previous step.
This is the Buy with Prime target ID to give to your Buy with Prime solutions architect.
Step 5: Register your LWA security profile with the Buy with Prime team
To register your LWA security profile with Buy with Prime, give your Buy with Prime solutions architect the following information:
- Your LWA security profile ID: You found this in Step 3.
- Buy with Prime target ID: You found this in Step 4.
Your Buy with Prime solutions architect will let you know when the allow-list process is complete. Your LWA security profile will then be able to request the following access scopes:
buywithprime::merchant_ordersprofileprofile:default_shipping_addressprofile:mobile_number
If you Use the Buy with Prime UI Library, the UI library manages the requesting of the proper scopes. In any case, you must register your LWA security profile with the Buy with Prime team.
Step 6: Handle redirects
When a shopper clicks "Sign In" on a delivery card that you display on your site, the delivery card redirects them to a sign-in page through LWA.
After the shopper signs in, LWA redirects them to the redirect URL that you specified in the delivery card and allow-listed as an Allowed Return URL in the security profile that you configured in Step 3 of this procedure.
Generally, shoppers expect to be redirected back to the same page where they clicked the sign-in button. The redirect URL can be one of two types:
-
A static URL that doesn’t have any parameters, such as
https://www.example.com/checkout. -
A dynamic URL that has parameters that change based on various pages of that type, such as for a product detail page (
https://www.example.com/product/red-shirt-1) or a cart page with a cart ID in the URL (https://www.example.com/cart/cart-id).
The following sections show how to handle both types of redirects.
Handle static redirects
To handle static redirects, perform the following steps.
To handle static redirects
-
Add the static URL as an Allowed Return URL in your LWA security profile.
For example, if you use the delivery card in a cart page whose URL ishttps://www.example.com/cart, addhttps://www.example.com/cartto the Allowed Return URLs in the LWA security profile. -
In your code, either hard-code the static URL into the
lwaConfigthat your delivery card uses, or set the static redirect URL based on the HTML of the page. The following code examples show both approaches.Set the static URL as the
redirectUrlin thelwaConfigthat the delivery card usesconst lwAConfig = { clientId: "yourLoginWithAmazonClientId", redirectUrl: "https://www.example.com/cart", signOutCallback: function() { // Placeholder for implementing the sign-out logic, such as clearing the shopper's state for the current session }, } };Set the static redirect URL that you get from the current page's HTML
const lwAConfig = {
 clientId: "yourLoginWithAmazonClientId",
 redirectUrl: windows.location.href,
 signOutCallback: function() {
   // Placeholder for implementing the sign-out logic, such as clearing the shopper's state for the current session           },
 }
};
Handle dynamic redirects
Static redirection isn't practical for all pages with a delivery card. For example, if you want to redirect a shopper back to product detail pages where the URL contains variables like product names or product IDs, it isn't feasible to allow-list every product URL in the Allowed Return URLs of your LWA security profile. For these cases, use dynamic redirects.
To enable dynamic redirects, you must set up a redirect handler page such as https://www.example.com/bwp-signin-redirect. Add your redirect handler page's URL to the Allowed Return URLs of your LWA security profile. Your redirect handler page manages the authentication response from Amazon and directs users to destination URLs dynamically after the user signs in. You can include the dynamic URL and an anti-forgery key in the state parameter of your request to ensure redirection back to the dynamic URL and safeguard against cross-site request forgery (CSRF).
To handle dynamic redirection, perform the following steps.
To handle dynamic redirects
-
Add the URL of your redirect handler page (for example,
https://www.example.com/bwp-signin-redirect) to the Allowed Return URLs in your LWA security profile. -
On dynamic page load, generate an encoded state and maintain a server-side mapping between
the current browser session and the state. See the code example later in this section. -
When the shopper clicks the sign-in link, redirect them to the redirect handler page and include the state.
-
After sign-in is complete, process and verify the authorization code that LWA provides in the redirect. For details, see Handle the Authorization Code Flow.
-
Redirect the shopper to the final URL.
For details, see Dynamically Redirect Users in the LWA documentation.
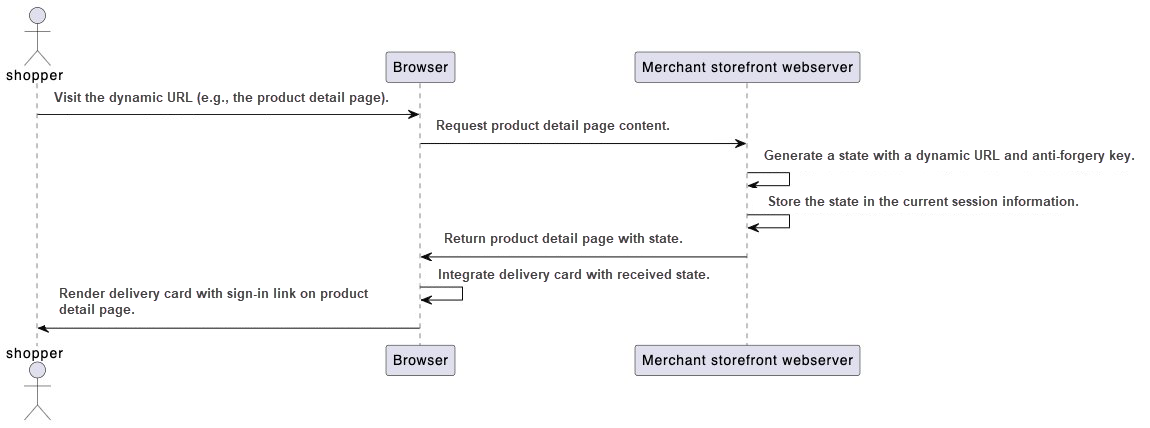
The following diagram provides an overview of how to handle dynamic redirect on page load.

Dynamic Redirection Flow
Dynamic redirection includes the following steps:
-
The shopper visits a dynamic URL such as a product detail page.
The dynamic redirection flow starts when the shopper visits a product detail page that contains a delivery card that they use to sign in. -
The web server generates a state with a dynamic URL and an anti-forgery key.
To handle the page load request, you must set up a route to handle requests to dynamic URLs on the server side. When the server receives a GET request, it can generate a state with the current page’s URL and an anti-forgery key. We recommend that you encode the state with at least 256 bits of entropy. For details, see Calculating the State Parameter.// JavaScript running on the server-side (using Node.js) //...other JavaScript code const express = require('express'); const app = express(); const crypto = require('crypto'); // The client is requesting to load the product detail page. app.post('/products/:<product-id>', (req, res) => { const productId = req.params.productId; const tabId = req.tabId; // Assumes a unique tabId is generated for each tab. const sessionId = req.sessionID; // Assumes session management middleware that assigns a session ID. // Get the current page URL. const protocol = req.protocol; const host = req.hostname; const urlPath = req.originalUrl; // Includes the path and query string const dynamicUrl = `${protocol}://${host}${urlPath}`; // Generate a UUID as an anti-forgery key. // This is specific to CSRF handling, so it is optional if your site has other CSRF-handling mechanisms. const antiForgeryKey = crypto.randomUUID(); // Generate a state with a dynamic URL and an anti-forgery key. const state = Buffer.from(`${antiForgeryKey} ${dynamicUrl}`).toString('base64'); // ... Next steps. }); // ...other JavaScript -
The web server stores the state in the current session information and returns to the product detail page with the state.
See the following code.// JavaScript running on the server-side (using Node.js) // ...Other JavaScript code // Store data in the session management database. async function saveToSessionDB(sessionId, data) { // Implement database saving logic here. } // Get the date from the session database. async function getFromSessionDB(sessionId, data) { // Your database logic to retrieve session data. return data_from_db; // Simulate retrieval } // The client is requesting to load the product detail page. app.post('/products/:<product-id>', (req, res) => { // ... Other JavaScript code try { // Get sessionState map from the session database. const sessionState = await getFromSessionDB(sessionId, 'sessionState') // Store the state created in the previous step in the current session information. sessionState[tabId] = state; await saveToSessionDB(sessionId, { 'sessionState' : sessionState}); // Return the product detail page with the state. res.render('product-detail-page', { productId: productId, state: state }); } catch (error) { // Implement error handling here. } }); // ...other JavaScript -
The browser renders a delivery card with the state and a redirect URL in the
lwaConfig.
Upon receiving the state from the server, the client can render the delivery card with the received state. For additional delivery card examples, see Delivery Card Examples.// Javascript running on the client side. // Import the pni-web-components.js in your HTML file. <script type="module" src="/path/to/pni-web-components.js"></script> //...Other HTML <script> document.addEventListener('DOMContentLoaded', function() { const deliveryCard = document.createElement('delivery-card'); deliveryCard.lwaConfig = { clientId: "amzn1.application-oa2-client.your-unique-client-id", redirectUrl: "https://www.example.com/bwp-signin-redirect", signOutCallback: function() { // Placeholder for implementing the sign-out logic, such as clearing the shopper's state for the current session }, }, state: "receivedState", }; document.body.appendChild(deliveryCard); }); </script> //...Other HTML
Step 7: Handle the authorization code flow
When a shopper clicks the sign-in link from a delivery card on your site, the delivery card initiates the authorization code grant flow. After the shopper successfully signs in, LWA redirects the shopper to the redirect URL with the authorization code, scope, and state in the query parameters.
The following example shows a redirect URL: https://www.example.com/bwp-signin-redirect?code=example-code&state=example-state&scope=profile.
You must extract the code from the query parameters. For dynamic redirects, you must also extract the state from the query parameters and process the state against a stored state on server side.
After you extract the code, you can exchange it for an access token and refresh token. For details, see Access Token Request. Because LWA access tokens expire in one hour, you can use the refresh token to get a new access token. For details, see Using Refresh Tokens. To ensure continuous access throughout a session, you can link the refresh token with the current session in server-side session storage.
The following example shows the authorization code flow with dynamic redirects on a redirect handler page after the shopper signs in.
Authorization code flow example
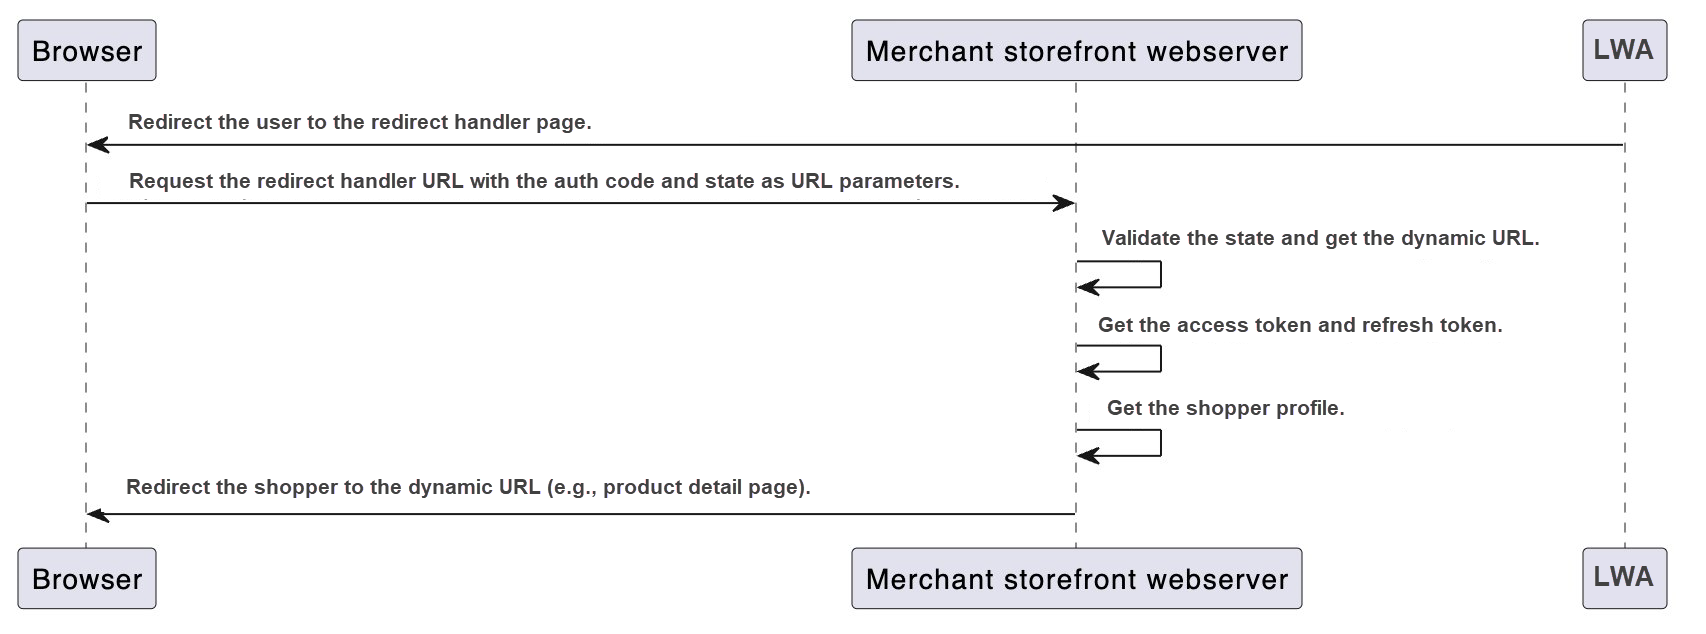
The following diagram provides an overview of the authorization code flow.

Authorization Code Flow
The authorization code flow has the following steps:
-
LWA redirects the shopper to the redirect handler page after shopper signs in.
After the shopper successfully signs in, LWA redirects the shopper to the redirect handler page with an authorization code, scope, and state in query parameters. The following example shows a redirect URL:https://www.example.com/bwp-signin-redirect?code=example-code&state=example-state&scope=profile. -
The web server validates the state and decodes it to get a dynamic URL.
The server extracts thecodeandstateparameters from the URL, validates thestateto guard against CSRF attacks, and then decodes thestateto get the dynamic URL. The dynamic URL will redirect the shopper back to the product detail page, as shown in the following server-side code example.const express = require('express'); const app = express(); // Function to store data in a session management database. async function saveToSessionDB(sessionId, data) { // Implement database-saving logic here. } // Function to get the date from a session database. async function getFromSessionDB(sessionId, data) { // Your database logic to retrieve session data. return data_from_db; // Simulate retrieval } // Function to validate the redirect URL to prevent open redirects. function validateUrl(url) { // Your validation logic to ensure that the URL is in your Allowed Return URLs list in LWA. } // The client is requesting to load the redirect handler page. app.post('/bwp-signin-redirect/:state/:code', (req, res) => { const state = req.params.state; const tabId = req.tabId; // Assumes a unique tabId is generated for each tab. const sessionId = req.sessionID; // Assumes session management middleware that assigns a session ID. // Get the state from the current session database. const sessionState = await getFromSessionDB(sessionId,'sessionState'); const storedState = sessionState[tabId]; // Clear the state for the tabId in the sessionState. delete sessionState[tabId]; await saveToSessionDB(sessionId,{'sessionState':sessionState}); // Validate the state and get the dynamicUrl. if (state === storedState) { // Decode the base64 state. const decodedState = Buffer.from(encodedState, 'base64').toString('utf-8'); // Split the decoded state(`${forgeryKey} ${dynamicUrl}`) by spaces to get the components. const components = decodedState.split(' '); const dynamicUrl = components[1]; // We recommend that you validate the dynamicUrl to prevent open redirects. if (!validateUrl(dynamicUrl)){ // Implement error handling here. } // ...Remaining steps. } }); -
The web server gets the access token and refresh token.
To get the LWA OAuth tokens with a code, redirect URL, LWA client ID, and LWA client secret, follow Authorization Code Grant in the LWA documentation.We recommend that you save the refresh token in the session data to maintain continuous access to the access token. For details, see Using Refresh Tokens. You therefore can maintain the shopper's signed-in state for the current session. It's important to clear the stored shopper state from the session after the session ends or the shopper signs out. You can define the sign out logic in the
signOutCallbackfunction in theLwAConfig.The following code shows how to get the access token and refresh token.
const express = require('express'); const app = express(); // Store data in session management database. async function saveToSessionDB(sessionId, data) { // Implement database-saving logic here. } // The client is requesting to load the redirect handler page. app.post('/bwp-signin-redirect/:state/:code', (req, res) => { const code = req.params.code; const sessionId = req.sessionID; // Assumes session management middleware that assigns a session ID. const redirectUrl= "https://www.example.com/bwp-signin-redirect"; // ...other JavaScript code if (state === storedState) { //...other JavaScript code try { // Get the LWA access token and refresh token. const oAuthToken = await getLWAOAuthToken(code, redirectUrl); // Save the access token and refresh token in the session database. await saveToSessionDB(sessionId, {'accessToken': oAuthToken.access_token}); await saveToSessionDB(sessionId, {'refreshToken': oAuthToken.refresh_token}); } catch (error) { // Implement error handling here } // ...Remaining steps. } }); // Get LWA oAuthToken with code and redirectUrl. async function getLWAOAuthToken(code, redirectUrl) { try { // Define parameters for the OAuth token request. const params = new URLSearchParams({ grant_type: 'authorization_code', code: code, client_id: 'amzn1.application-oa2-client.your-uniqe-client-id', // LWA client ID client_secret: 'LWA_CLIENT_SECRET', // LWA client secret redirect_uri: redirectUrl, // For exmaple, https://www.example.com/bwp-signin-redirect }); const response = await fetch('https://api.amazon.com/auth/o2/token', { method: 'POST', headers: { 'Content-Type': 'application/x-www-form-urlencoded' }, body: params.toString(), }); if (!response.ok) { // Implement error handling here } return await response.json(); } catch (error) { // Implement error handling here. } } -
The web server gets the shopper's profile data.
After you receive the access token in the access token response, you can get the shopper's Amazon customer profile data, which includes the shopper's name, email, default shipping address (optional), and mobile number (optional). For details, see Call the Profile Endpoint Server-Side in the LWA documentation.For an example of how to get the shopper's profile data, see the following code.
const express = require('express'); const app = express(); //Function to get the date from a session database. async function getFromSessionDB(sessionId, data) { // Your database logic to retrieve session data. return data_from_db; // Simulate retrieval } // The client is requesting to load the redirect handler page. app.post('/bwp-signin-redirect/:state/:code', (req, res) => { const sessionId = req.sessionID; // Assumes session management middleware that assigns a session ID // ...other JavaScript code if (state === storedState) { // ...other JavaScript code // Get the LWA shopper profile try { // Retrieve the access token saved in the previous step. const accessToken = await getFromSessionDB(sessionId, 'accessToken'); // Get shopper profile with access token. const shopperInfo = await getLWAShopperInfo(oAuthToken.accessToken); // Placeholder to store the shopper profile. } catch (error) { // Implement error handling here } } }); // Get the LWA shopper profile with the LWA access token. async function getLWAShopperInfo(accessToken) { try { const response = await fetch('https://api.amazon.com/user/profile', { method: 'GET', headers: { 'Authorization': 'Bearer ${accessToken}' }, if (!response.ok) { // Implement error handling here } return await response.json(); } catch (error) { // Implement error handling here } }); -
The web server redirects the shopper back to the dynamic URL.
After completing the authorization flow and getting the shopper's profile data, the server can redirect the shopper to the dynamic URL (for example, the product detail page), that you got in an earlier step.The following example shows how to redirect the shopper.
const express = require('express');
const app = express();

// The client is requesting to load the redirect handler page.
app.post('/bwp-signin-redirect/:state/:code', (req, res) => {

   //...other JavaScript code

    if(state === storedState) {
       // ...other JavaScript code.

       // Redirect to the dynamic URL obtained in a previous step.
       res.redirect(302, dynamicUrl);
     }
});
Related topics
Updated 16 days ago
