Set up an LWA Security Profile
Buy with Prime API is now available for early access
Sign up for early access to the Buy with Prime API using the 'Sign Up' button below. The API may change as Amazon receives feedback and iterates on it.
Regardless of which LWA integration method you choose to use for Buy with Prime, you must set up an LWA security profile as described in the following section.
Steps to set up an LWA security profile
To set up an LWA security profile, take the following steps:
- Create an LWA security profile.
- Add your website to the LWA security profile.
- Get your LWA security profile information.
- Get your Buy with Prime target ID.
- Register your LWA security profile with the Buy with Prime team.
Step 1: Create an LWA security profile
Follow the steps in Create a New Security Profile.
Step 2: Add your website to the LWA security profile
You must now set up your Allowed Origins and Allowed Return URLs in your LWA security profile. These security measures help ensure that your site is authorized to access the shopper's Amazon customer profile data and that the shopper is redirected back to the correct page after the sign-in process.
Follow the steps in Add your Website to your Security Profile. In these steps, you set the following URLs:
-
Allowed Origins: Set this to your website's domain. For example, if your website's domain is
https://www.example.com, addhttps://www.example.comto Allowed Origins. -
Allowed Return URLs: Add any URLs that you want to redirect the user to after they sign in. Any
redirect_urithat you specify in an authorization request must be in your Allowed Return URLs list. In particular:- For static URLs, add the static URL (such as
https://www.example.com/cart) to the Allowed Return URLs. - For dynamic URLs, add your redirect handler URL (such as
https://www.example.com/bwp-signin-redirect) to the Allowed Return URLs.
- For static URLs, add the static URL (such as
For details about how static and dynamic URLs affect the authentication flow, see LWA Authentication Flow.
Step 3: Get your LWA security profile information
From your security profile settings in the LWA console, get the following information:
-
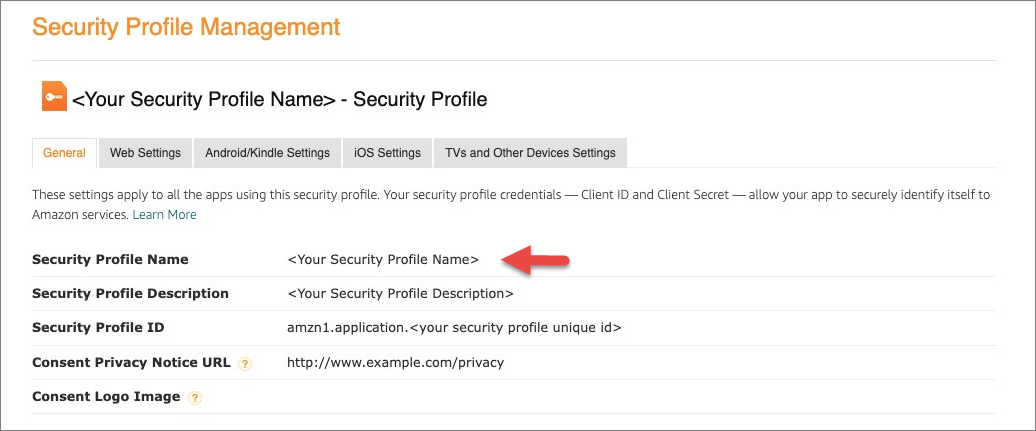
Security Profile ID: Get your security profile ID from the General tab of the security profile, as shown in the following figure.

-
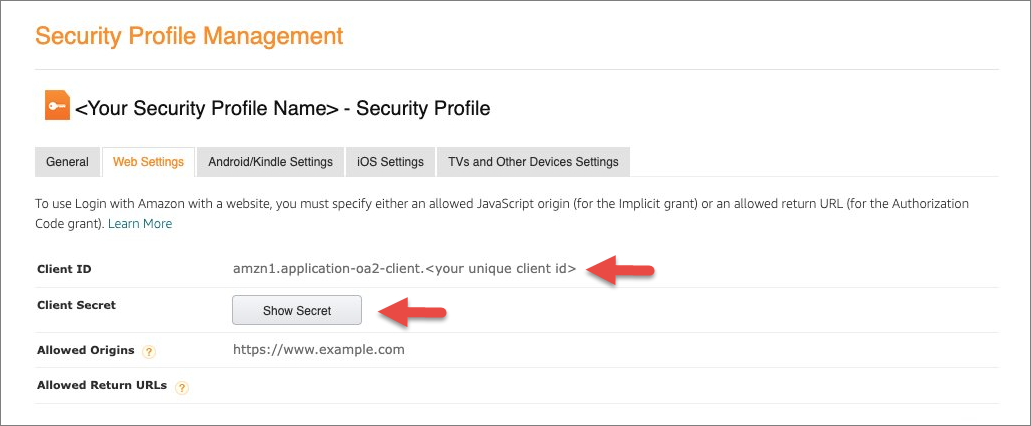
LWA Client ID and LWA Client Secret: Get this information from the Web settings tab of the security profile, as shown in the following figure.

Step 4: Get your Buy with Prime target ID
To find your Buy with Prime target ID in the Buy with Prime merchant console, perform the following steps.
To find your Buy with Prime target ID
-
Generate your API credentials in the Buy with Prime merchant console by using the following instructions: Generate API credentials.
-
In the credentials CSV file, find the TargetId.
This is the Buy with Prime target ID to give to your Buy with Prime solutions architect.
Step 5: Register your LWA security profile with the Buy with Prime team
To register your LWA security profile with Buy with Prime, give your Buy with Prime solutions architect the following information:
- Your LWA security profile ID: You found this in Step 3.
- Buy with Prime target ID: You found this in Step 4.
Your Buy with Prime solutions architect will let you know when the allow-list process is complete. Your LWA security profile will then be able to request the following access scopes:
buywithprime::merchant_ordersprofileprofile:default_shipping_addressprofile:mobile_number
Related topics
Updated 8 months ago
